Working with form submissions
Find your forms, read submissions, and set up where each form's entries are sent.
Forms collect the messages people send through your website — contact requests, sign-ups, enquiries and anything else built on a nua site form. The dashboard gives every form its own page where you can read recent submissions and decide where new ones are delivered.
Open the Forms list
- Open your project in the dashboard.
- Open the Forms tab.
You'll see a heading Forms with a Create Form button on the right, and a table of every form in the project (newest first).
If the project has no forms yet, you'll see No forms yet with a short note and a Create Your First Form button instead of the table.
What each row shows
| Column | What it means |
|---|---|
| Form ID | The form's unique identifier, shortened (first characters followed by ...). The full ID is shown on the form's own page. |
| Forward-to Emails | How many email addresses new submissions are forwarded to. |
| Submissions | How many entries the form has collected. |
| Created | The date the form was created. |
| Manage | A link that opens the form's detail page. |
Create a form
- On the Forms list, click Create Form (top right). On an empty project, use Create Your First Form.
- The dashboard creates the form and opens its detail page automatically.
A new form starts empty — no forward-to emails, no webhooks and no submissions. Connect the form to your website so it starts collecting entries, then add at least one delivery method (see below).
Open a submission's details
- In the Forms list, find the form you want.
- Click Manage in that row.
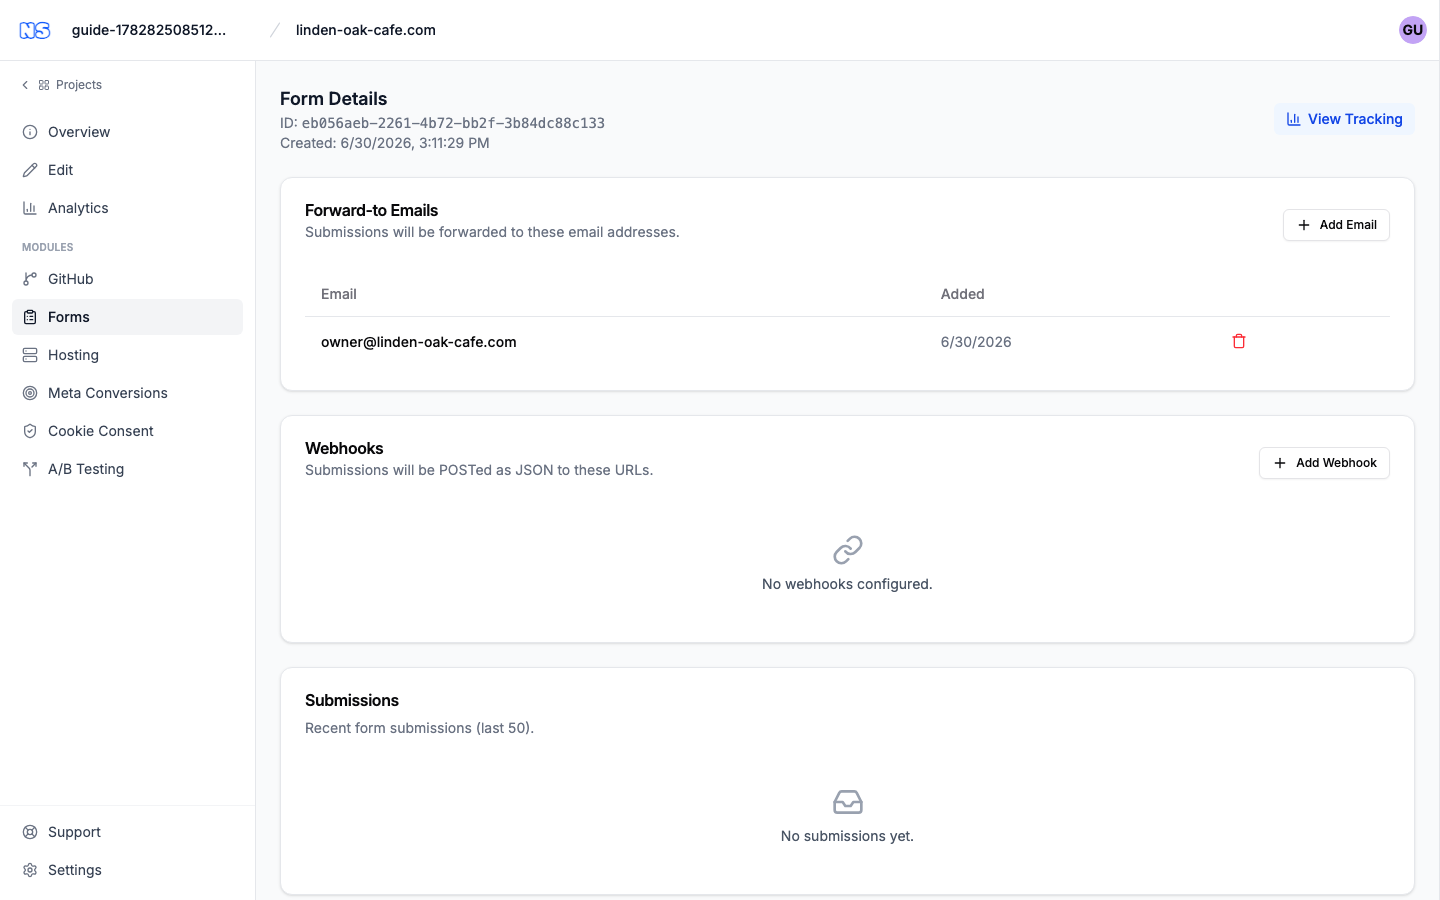
The form's detail page opens, headed Form Details, showing the full ID and the date it was Created. From here you can review submissions and manage delivery.
Tip: To see how people interact with the form — attempts, successes, rejections and spam — click View Tracking in the top-right of the detail page. See Form tracking.
Read submissions
Scroll to the Submissions card on the form's detail page. It lists the most recent entries (up to the last 50), newest first.
Each submission shows:
- The date and time it was received.
- The visitor's location (city and country), when available.
- A Spam score, shown in orange only when the entry looks suspicious. A higher number means the submission is more likely to be spam.
- The full submitted data, shown as the raw fields the visitor filled in.
If no one has submitted the form yet, the card shows No submissions yet.
Forward submissions to email
Use the Forward-to Emails card to have every new submission delivered to one or more inboxes.
- Click Add Email (top right of the card).
- Enter an address in Email Address.
- Click Add.
The address appears in the list with the date it was added. To stop forwarding to an address, click the trash icon in its row and confirm Remove this email?
If no addresses are set, the card shows No forward-to emails configured.
Note: Forwarding only affects submissions received after the address is added — it doesn't re-send past entries.
Send submissions to a webhook
Webhooks let another system receive each submission automatically. Every new entry is sent as JSON in an HTTP POST to the URLs you list in the Webhooks card.
Add a webhook
- Click Add Webhook (top right of the card).
- Enter the destination address in Webhook URL — a full URL (the field is prefilled with an
https://placeholder; use anhttps://endpoint so deliveries stay encrypted). - Click Add.
Each webhook is created with a signing secret — a value (starting with whsec_) the receiving system can use to confirm the request really came from your form. The secret is shown masked next to the URL; click the copy icon to copy the full value to your clipboard.
Test a webhook
- Find the webhook in the list.
- Click Test.
The dashboard sends a sample delivery and shows the result inline — Test successful with the HTTP status code, or a failure message with the status code and error.
Review recent deliveries
If a webhook has delivery history, a Recent deliveries row appears beneath it. Click it to expand the list. Each entry shows:
- A green or red dot for success or failure.
- The date and time of the delivery.
- A label for the kind of delivery (for example
test). - The HTTP status code returned, and any error message.
Remove a webhook
Click the trash icon next to the webhook and confirm Remove this webhook?
If no webhooks are set, the card shows No webhooks configured.
Warning: Removing a webhook stops all future deliveries to that URL immediately. Past deliveries are not affected, but the destination will no longer receive new submissions.