Credit and top-up
Understand your organization's credit balance and learn how to add more credit and pay.
Your organization runs on a shared pool of credit. Credit is spent on paid actions across your projects — such as unlocking a project or generating pages — so keeping a healthy balance means your work never stalls. This guide explains how to read your balance and how to top it up.
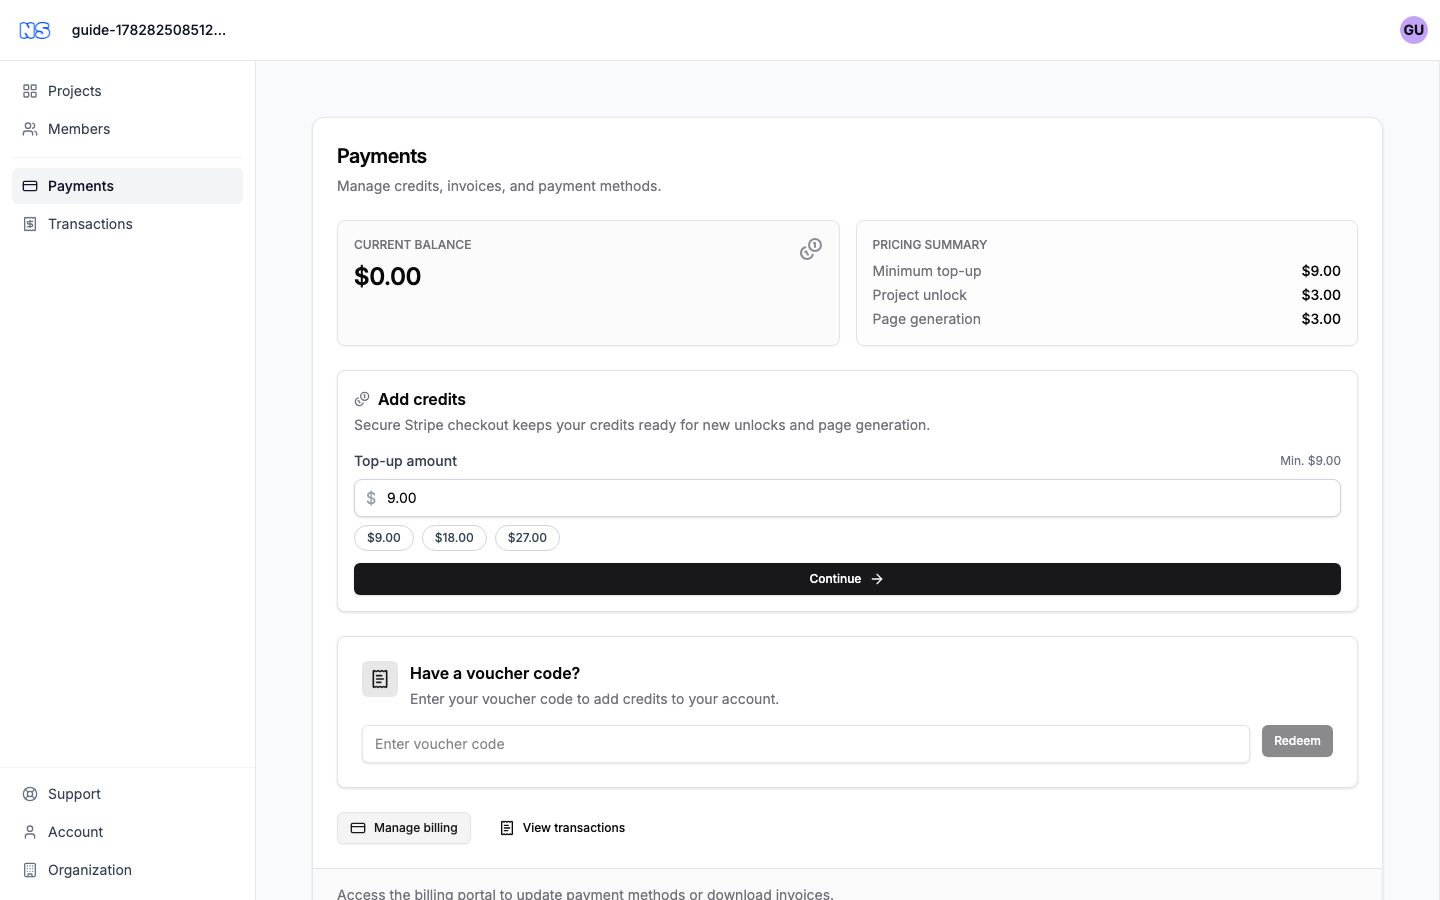
Where to see your balance
Your current balance appears in two places:
- The balance pill in the dashboard header, showing an amount like
$ 12.50. Click it to jump straight to the payments page. - The Current balance card at the top of the organization's Payments section.
Note: The balance is shared across the whole organization, not per person. Anyone working in the organization draws from the same pool.
Opening the Payments section
- Click the balance pill in the header, or choose Payments from the dashboard's left sidebar.
- The Payments section shows your Current balance, a Pricing summary, any Grant credits, and the tools to add credit.
Note: Payments is available to admins and owners. If you do not see it, ask an admin to top up, or to upgrade your role.
Understanding the Payments section
Pricing summary
The Pricing summary card lists the prices that apply to your organization, which may include:
| Item | What it means |
|---|---|
| Minimum top-up | The smallest amount you can add in a single top-up. |
| Project unlock | The cost to unlock a project. |
| Page generation | The cost to generate a page. |
Grant credits
If your hosting plan includes monthly credit, a Grant credits card lists those allowances per project, along with the date each one renews. As the card notes, grant credits are included monthly with your hosting plan, per project, and unused credits do not roll over. Grant credit is spent before your purchased balance where it applies.
Topping up your credit
Use the Add credits card to buy more credit through secure Stripe checkout.
- In the Payments section, find the Add credits card.
- In the Top-up amount field, enter how much credit you want to add. The field shows the minimum next to it (for example, Min. $5.00), and you can click one of the quick-amount buttons to fill in a preset value.
- Click Continue. The button stays disabled until your amount is at least the minimum.
- You are taken to Stripe checkout to enter your payment details and confirm the payment.
Tip: The quick-amount buttons offer the minimum and a couple of larger multiples, so you can top up in one click instead of typing an amount.
After you pay — the processing screen
When Stripe finishes, you are returned to a processing screen while your payment is confirmed. You will see one of these states:
- Processing your payment... — a spinner with the note This usually takes just a few seconds. The screen checks for an update automatically every couple of seconds, so there is nothing to click.
- Payment successful! — a green confirmation. The screen then redirects you back automatically (you do not need to refresh).
- Payment failed — a red message explaining what went wrong, with a Go to payments button to return and try again.
Note: Your new credit usually appears in your balance within a few seconds of a successful payment. If you started the top-up to complete a specific action, you are returned to where you left off once the payment clears.
If you cancel out of Stripe checkout without paying, you return to the Payments section with a Payment cancelled notice — no charge is made, and you can start a new payment whenever you like.
Redeeming a voucher
If you have a voucher code, you can add credit without paying.
- In the Payments section, find the Have a voucher code? card.
- Type your code into the Enter voucher code field.
- Click Redeem.
On success you see a confirmation telling you how much credit was added, and your balance updates right away. If the code is invalid or already used, an error message explains why.
Managing your payment method and invoices
Click Manage billing in the Payments section to open Stripe's customer portal, where you can update your payment method and download invoices. When you are done, the portal returns you to the dashboard.
To review what you have been charged and credited, open View transactions — see Transactions for a full breakdown.